How to Create and Verify GST Challans: A Step-by-Step Practice Guide
This article is designed to explain how to generate the GST Challan and how you can practice it with 0% risk and without needing an account. So, without wasting any time, let’s get started.
How to Generate GST Challan on GST Portal
To generate the GST challan, follow the steps below
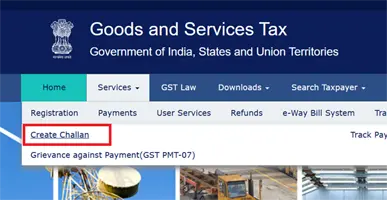
Step 2: Now click on the Create Challan button, which is present in the Payment section under the Services.
GST Portal - Find Create Challan Option
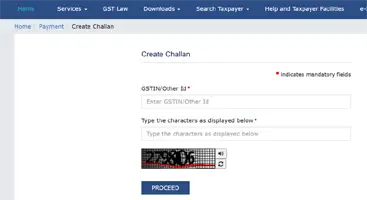
Step 3: Now, the portal will navigate you to another screen to log in. Enter your GSTIN/Other ID, whatever you have, then enter the verification code which is present in the box below (like a CAPTCHA), then enter the OTP from the available options and click on the PROCEED button.
GST Portal - Login Screen After successful login, you will reach the below-mentioned screen.
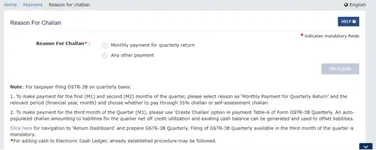
GST Portal - Select Reason for Challan
Step 4: Now choose your Reason for Challan either “Monthly payment for quarterly return” or “Any other payment” and click on the “PROCEED” button.
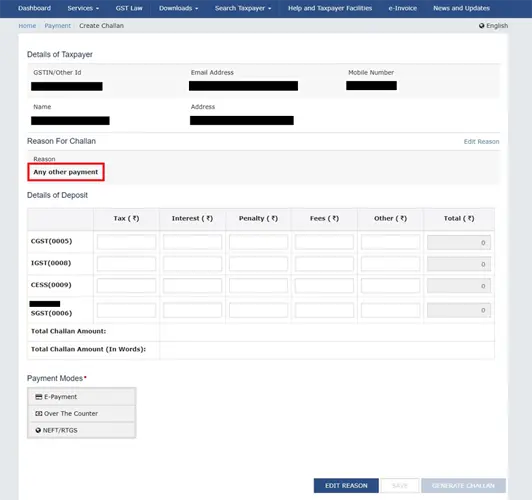
Step 5: After clicking on the PROCEED button, the portal navigates to the Create GST Challan screen.
GST Portal - Create Challan Main Screen
Now fill the amount into the input boxes for CGST, IGST, CESS, SGST for the tax, interest, penalty fees, and other.
For example: if you want to pay 8,000 in tax for CGST and SGST, then the tax amount for CGST will be 4,000, and for SGST, the tax amount should be the same as 4,000.
Step 6: Choose your payment method from “E-Payment”, “Over The Counter”, “NEFT/RTGS”.
E-Payment: If you choose this mode, payment can be made through the bank’s internet banking system. When the payment process is completed successfully, the challan gets automatically updated.
Over the Counter: Choose this mode if you wish to make payment by visiting an authorized bank branch. Create a challan and deposit it at the bank to make payment. OTC mode is applicable only for making payments up to ₹10,000. Payments beyond ₹10,000 can only be made through E-Payment or NEFT/RTGS mode.
NEFT/RTGS: Select this mode if you wish to make the payment by bank transfer. First, create the challan and deposit the amount via bank by NEFT or RTGS method.
Suppose you choose the E-Payment mode; then the option to generate the Challan and save the challan is automatically enabled.
GST Portal - Generate Challan buttons
Step 7: Click on the GENERATE CHALLAN button to generate the challan, and you will get a message at the top of the computer confirming whether your GST challan was generated successfully, along with the relevant details, as shown in the image.
GST Portal - Success message for suffcessfully generated Challan Now, review all the amount details that you entered in the earlier screen.
Step 8: Now choose your desired mode of E-Payment, select the bank, and check the box “I agree to the terms and conditions”.
After checking the box for I agree to the terms and conditions the MAKE PAYMENT button will be enabled. Click on this MAKE PAYMENT button to proceed.
Step 9: Now, the final step: make the online payment according to your selected payment mode, such as Net Banking, BHIM UPI, Credit/Debit, or Preferred Bank.
After successful payment, your challan updates automatically after some time. With this, the process of generating the GST Challan with payment is completed.Congratulations in advance; you have learned how to generate the GST Challan and verify the GST Challan by downloading the Challan as a PDF.
How to Practice GST Challan
Now the question is how to practice the GST Challan because there is only one official government portal to generate the GST Challan. And this challan is recorded in government official records with your assigned GSTIN.
So, you need to be very careful about the process of generating the GST Challan. And on the government portal, you cannot create a dummy record just for practicing.
That is why we built the Learn GST Challan simulator to practice the GST Challan an infinite number of times without affecting any official government records. You can practice with our tool without creating any GSTIN Number or any type of account, with 0% payment risk. And this tool is 100% free of cost.
Video: Demo to practice GST Challan.
You can practice with our tool on any device because it is completely online.
You can also download the challan as a PDF, same as on the official portal.
These features make our tool a 100% good educational tool.
We designed this tool specifically for business owners, accountants, and beginners who want a smooth GST payment experience. We always update our tool with simulations of new features rolled out by the official portal.
If you are teaching accounting, then you can definitely recommend our tool, Learn GST Challan, to students to learn the complete process of generating the GST Challan.
You can find out more business tools by dhimanp on the business page. If you have any queries about our tool, feel free to reach out via our official Contact Us page.